3.3 Bert模型
学习目标:
1.能够完成数据集的读取及预处理
2.理解dataSet、dataloader与collate_fn关系
3.能够完成Bert分类模型的构建
4.能够完成Bert模型的训练与测试
5.能够完成Bert分类模型的预测以及部署
Tips:
以下是transformer框架以及bert模型的架构。
bert的模型结构:(输入维度 batch_size为2 )
=========================================================================================================
Layer (type:depth-idx)                                  Output Shape              Param #
=========================================================================================================
BertModel                                               [2, 768]                  --
├─BertEmbeddings: 1-1                                   [2, 128, 768]             --
│    └─Embedding: 2-1                                   [2, 128, 768]             16,226,304
│    └─Embedding: 2-2                                   [2, 128, 768]             1,536
│    └─Embedding: 2-3                                   [1, 128, 768]             393,216
│    └─LayerNorm: 2-4                                   [2, 128, 768]             1,536
│    └─Dropout: 2-5                                     [2, 128, 768]             --
├─BertEncoder: 1-2                                      [2, 128, 768]             --
│    └─ModuleList: 2-6                                  --                        --
│    │    └─BertLayer: 3-1                              [2, 128, 768]             7,087,872
│    │    └─BertLayer: 3-2                              [2, 128, 768]             7,087,872
│    │    └─BertLayer: 3-3                              [2, 128, 768]             7,087,872
│    │    └─BertLayer: 3-4                              [2, 128, 768]             7,087,872
│    │    └─BertLayer: 3-5                              [2, 128, 768]             7,087,872
│    │    └─BertLayer: 3-6                              [2, 128, 768]             7,087,872
│    │    └─BertLayer: 3-7                              [2, 128, 768]             7,087,872
│    │    └─BertLayer: 3-8                              [2, 128, 768]             7,087,872
│    │    └─BertLayer: 3-9                              [2, 128, 768]             7,087,872
│    │    └─BertLayer: 3-10                             [2, 128, 768]             7,087,872
│    │    └─BertLayer: 3-11                             [2, 128, 768]             7,087,872
│    │    └─BertLayer: 3-12                             [2, 128, 768]             7,087,872
├─BertPooler: 1-3                                       [2, 768]                  --
│    └─Linear: 2-7                                      [2, 768]                  590,592
│    └─Tanh: 2-8                                        [2, 768]                  --
=========================================================================================================
- BertLayer 是 BERT 模型的核心组件,对应 Transformer 架构中的一个 encoder 层。
(一) 代码结构图
代码位置:

基于Bert进行分类建模思路:
①下载bert预训练模型
目前bert的版本脚本,本次使用中文版的bert,bert下载
②构建数据处理脚本 对数据train.txt等相关样本文件进行处理,构建符合模型输入要求的训练数据。 处理脚本:TMFCode\04-bert\src\utils.py
③构建bert + 线性模块的 分类模型
Bert是一个预训练模型,所以我们可以基于bert模型本身加上一个线性分类层来构建我们的下游任务。
模型脚本:TMFCode\04-bert\src\bert_classifer_model.py
④构建训练脚本
⑤构建预测脚本
⑥构建模型部署、api测试脚本

(二) 代码实现
2.1 config配置文件
代码位置:TMFCode\04-bert\src\config.py
import torch
import os
import datetime
from transformers.models import BertModel,BertTokenizer,BertConfig
current_date=datetime.datetime.now().date().strftime("%Y%m%d")

class Config(object):
    def __init__(self):
        """
        配置类,包含模型和训练所需的各种参数。
        """
        self.model_name = "bert" # 模型名称
        self.data_path = "../../01-data"  #数据集的根路径
        self.train_path = self.data_path + "\\train.txt"  # 训练集
        self.dev_path = self.data_path + "\\dev3.txt"  # 少量验证集,快速验证
        self.test_path = self.data_path + "\\test.txt"  # 测试集

        self.class_path=self.data_path + "\\class.txt" #类别文件

        self.class_list = [line.strip() for line in open(self.class_path, encoding="utf-8")]  # 类别名单

        self.model_save_path = "../save_models/test_bertclassifer_model.pt"  #模型训练结果保存路径

        # 模型训练+预测的时候
        # 训练设备,如果GPU可用,则为cuda,否则为cpu
        self.device = torch.device("cuda" if torch.cuda.is_available() else "cpu")

        self.num_classes = len(self.class_list)  # 类别数
        self.num_epochs = 2  # epoch数
        self.batch_size = 2  # mini-batch大小
        self.pad_size = 32  # 每句话处理成的长度(短填长切)
        self.learning_rate = 5e-5  # 学习率
        self.bert_path = "../bert-base-chinese"  # 预训练BERT模型的路径
        self.bert_model=BertModel.from_pretrained(self.bert_path)
        self.tokenizer = BertTokenizer.from_pretrained(self.bert_path) # BERT模型的分词器
        self.bert_config = BertConfig.from_pretrained(self.bert_path) # BERT模型的配置
        self.hidden_size = 768 # BERT模型的隐藏层大小

if __name__ == '__main__':
    conf = Config()
    print(conf.bert_config)
    input_size=conf.tokenizer.convert_tokens_to_ids(["你","好","中国","人"])
    print(input_size)
    print(conf.class_list)
2.2 utils配置文件
代码位置:TMFCode\04-bert\src\utils.py
utils脚本主要实现了train.txt相关数据读取加载切分,以及DataSet、DataLoader的构建,最终输出符合模型需求的数据格式。
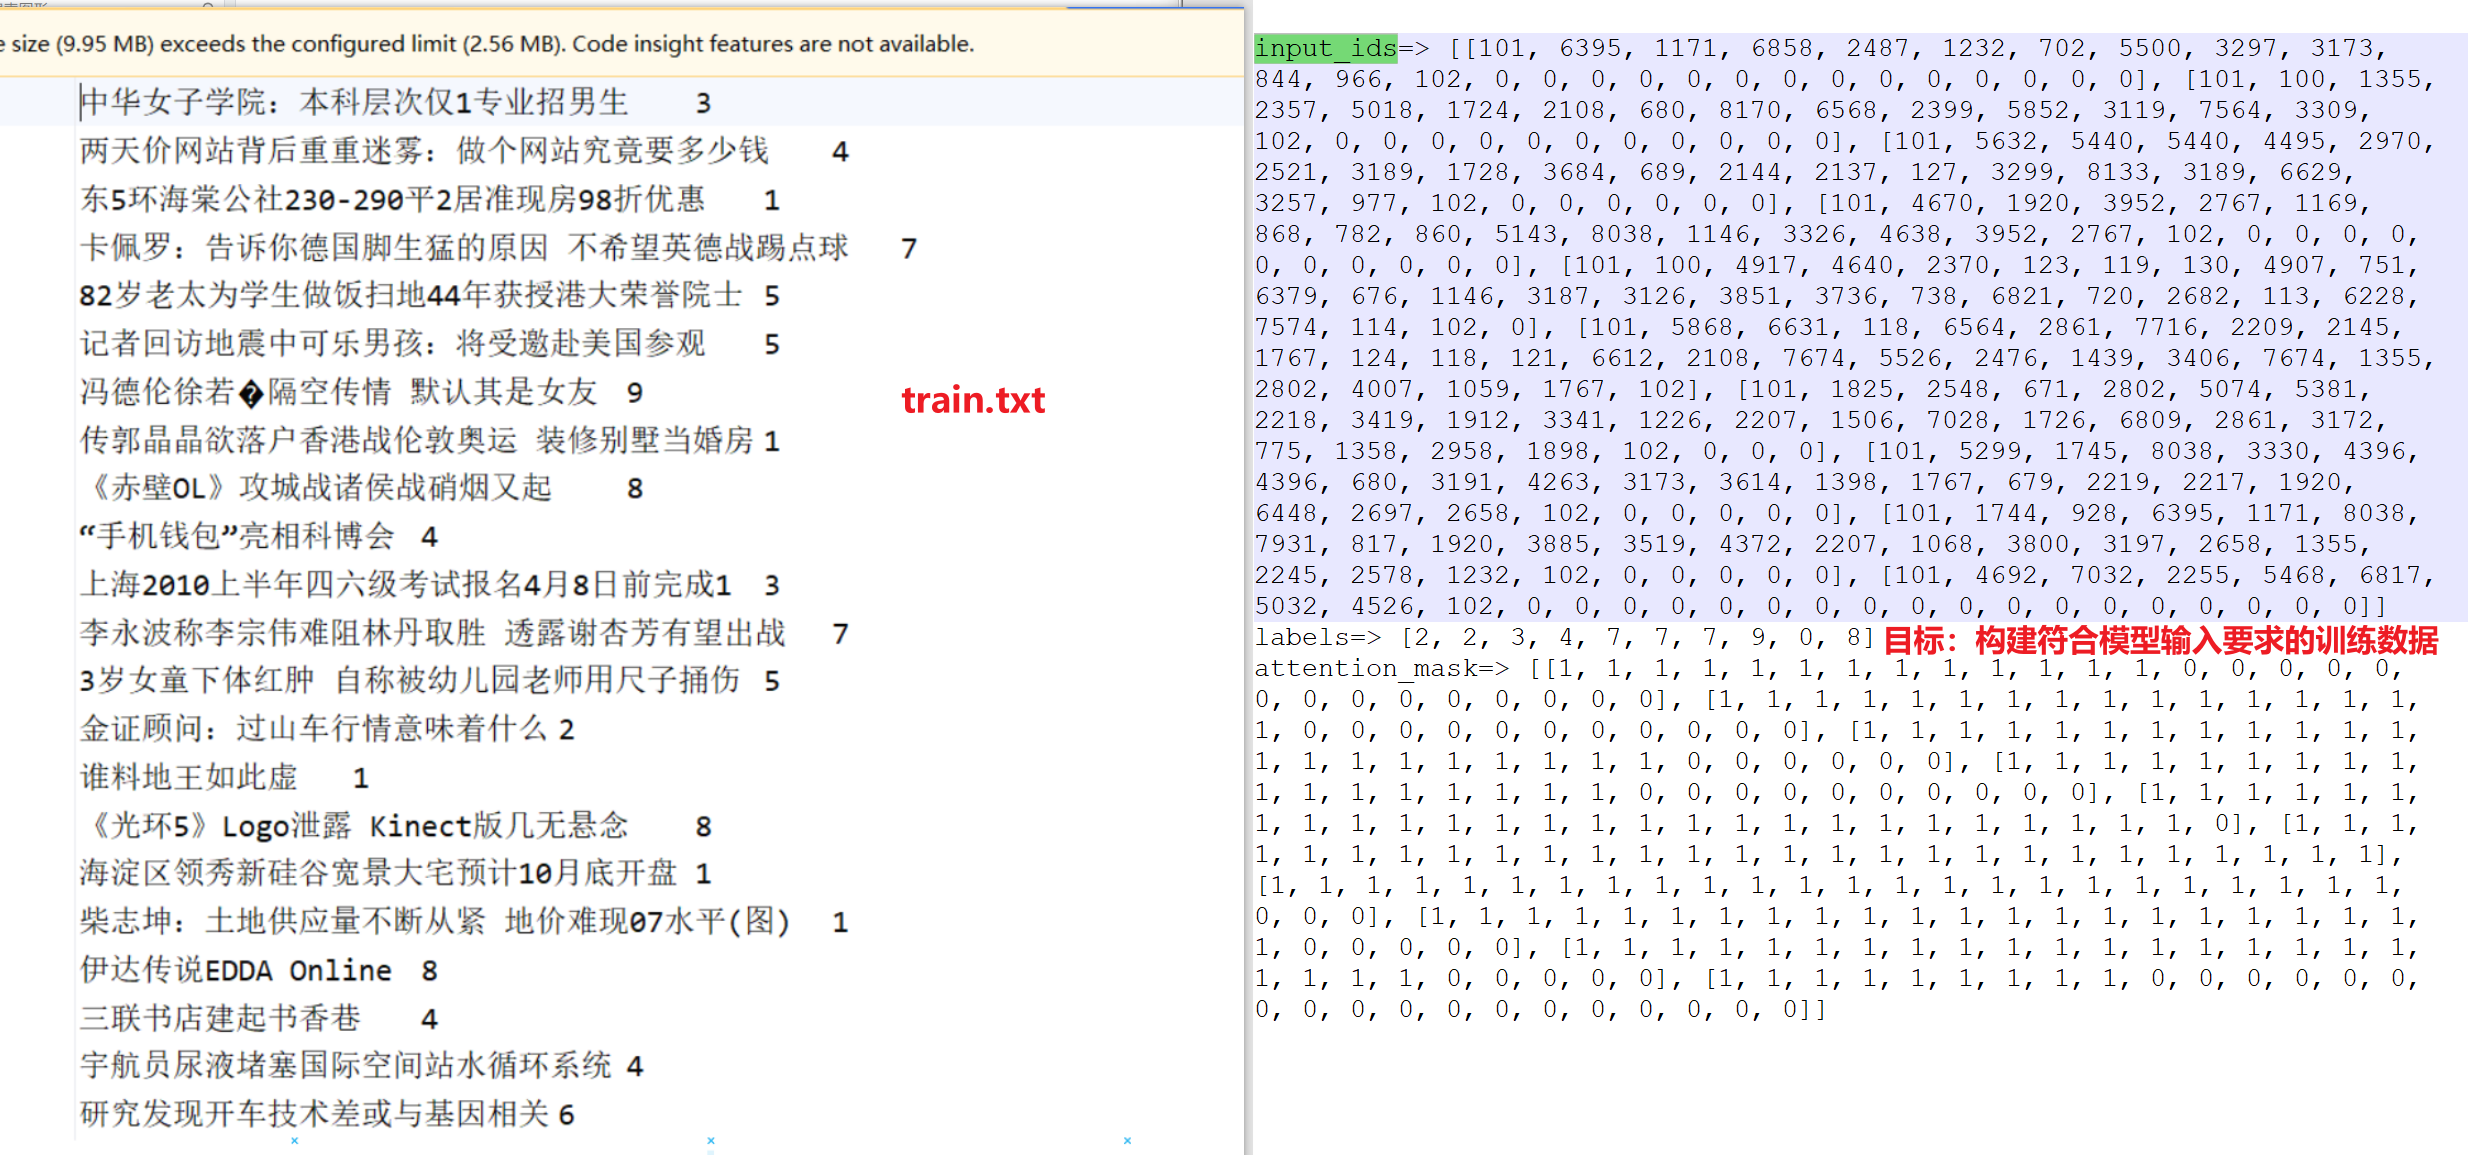
input_ids=> [[101, 704, 1290, 1957, 2094, 2110, 7368, 8038, 3315, 4906, 2231, 3613, 788, 122, 683, 689, 2875, 4511, 4495, 102, 0, 0, 0, 0], [101, 697, 1921, 817, 5381, 4991, 5520, 1400, 7028, 7028, 6837, 7443, 8038, 976, 702, 5381, 4991, 4955, 4994, 6206, 1914, 2208, 7178, 102]]
labels=> [3, 4]
attention_mask=> [[1, 1, 1, 1, 1, 1, 1, 1, 1, 1, 1, 1, 1, 1, 1, 1, 1, 1, 1, 1, 0, 0, 0, 0], [1, 1, 1, 1, 1, 1, 1, 1, 1, 1, 1, 1, 1, 1, 1, 1, 1, 1, 1, 1, 1, 1, 1, 1]]
导入工具和配置信息:
import torch
from torch.utils.data import Dataset, DataLoader
from transformers import BertTokenizer
from tqdm import tqdm
import time
from datetime import timedelta
from config import Config
import time
conf=Config()
(1) 加载原始数据
读取原始数据train.txt等相关文件,进行切分之后,以元组的形式保存样本对到列表中。
train.txt处理为左侧的data列表:

def load_raw_data(file_path):
    """
    读取原始数据文件,解析为文本和标签。

    参数:
        file_path (str): 数据文件路径(如dev2.txt)。

    返回:
        List[Tuple[str, int]]: 包含(文本, 标签)的列表。
    """
    data = []
    with open(file_path, "r", encoding="UTF-8") as f:
        for line in tqdm(f, desc="Loading data"):
            line = line.strip()
            if not line:
                continue
            text, label = line.split("\t")
            data.append((text, int(label)))
    print(data[:5])
    return data
(2) 构建自定义数据集
我们模型构建包括批计算都基于pytorch框架,所以我们数据要构建成符合pytorch模型需求的数据集。
class TextDataset(Dataset):
    def __init__(self, data):
        self.data = data

    def __len__(self):
        return len(self.data)

    def __getitem__(self, idx):
        x=self.data[idx][0]
        y=self.data[idx][1]
        return x, y
(3) 构建dataloader
构建dataloader用于后续建模中batch数据输入到模型中,进行loss的计算以及参数的迭代优化。
def build_dataloader():
    """
    构建DataLoader,整合数据加载、Dataset和collate_fn。

    参数:
        file_path (str): 数据文件路径。
        batch_size (int): 批次大小。
        padding_size (int): 统一padding长度(默认28)。
        device (str): 设备("cpu"或"cuda")。

    返回:
        DataLoader: 用于训练的DataLoader。
    """
    # 加载原始数据
    train_data = load_raw_data(conf.train_path)
    test_data = load_raw_data(conf.test_path)
    dev_data = load_raw_data(conf.dev_path)

    # 创建 Dataset
    train_dataset = TextDataset(train_data)
    dev_dataset = TextDataset(dev_data)
    test_dataset = TextDataset(test_data)

    # 创建 DataLoader
    train_dataloader = DataLoader(train_dataset,batch_size=conf.batch_size,shuffle=False,collate_fn=collate_fn)
    test_dataloader = DataLoader(test_dataset, batch_size=conf.batch_size, shuffle=False, collate_fn=collate_fn)
    dev_dataloader = DataLoader(dev_dataset, batch_size=conf.batch_size, shuffle=False, collate_fn=collate_fn)

    return train_dataloader,test_dataloader,dev_dataloader
(4) 构建collate_fn
collate_fn是dataloader为了解决进入模型训练的数据不符合要求的进一步处理,例如batch级别数据处理长度、数据数值化等。
def collate_fn(batch):
    """
    DataLoader的collate_fn,处理分词、统一padding、mask生成和Tensor转换。

    参数:
        batch (List[Tuple[str, int]]): 批次数据,包含(文本, 标签)。
        tokenizer (BertTokenizer): BERT分词器。
        padding_size (int): 统一padding长度(默认28,基于文本长度统计)。
        device (str): 设备("cpu"或"cuda")。

    返回:
        Tuple[torch.Tensor, ...]: (input_ids, seq_len, attention_mask, labels) 的Tensor格式。
    """
    # 提取文本和标签
    texts = [item[0] for item in batch]
    labels = [item[1] for item in batch]

    # 批量分词,自动添加 [CLS] 和 [SEP]  add_special_tokens  # padding,统一处理
    text_tokens = conf.tokenizer.batch_encode_plus(texts,padding=True)
    token_ids_list = text_tokens["input_ids"]
    token_attention_mask_list = text_tokens["attention_mask"]
    # 转为 Tensor
    input_ids = torch.tensor(token_ids_list)
    attention_mask = torch.tensor(token_attention_mask_list)
    labels = torch.tensor(labels)
    #
    # print("================================")
    # print(labels)
    # print(attention_mask)
    # print(input_ids)
    return input_ids, attention_mask, labels
(5) 验证数据处理完整逻辑
if __name__ == "__main__":
    # 构建 DataLoader
    train_dataloader,test_dataloader,dev_dataloader = build_dataloader()
    # #遍历 DataLoader
    for batch in train_dataloader:
        input_ids, attention_mask, labels = batch
        print("input_ids=>",input_ids.tolist())
        print("labels=>",labels.tolist())
        print("attention_mask=>",attention_mask.tolist())
        breakpoint()
输入日志:
input_ids=> [[101, 704, 1290, 1957, 2094, 2110, 7368, 8038, 3315, 4906, 2231, 3613, 788, 122, 683, 689, 2875, 4511, 4495, 102, 0, 0, 0, 0], [101, 697, 1921, 817, 5381, 4991, 5520, 1400, 7028, 7028, 6837, 7443, 8038, 976, 702, 5381, 4991, 4955, 4994, 6206, 1914, 2208, 7178, 102]]
labels=> [3, 4]
attention_mask=> [[1, 1, 1, 1, 1, 1, 1, 1, 1, 1, 1, 1, 1, 1, 1, 1, 1, 1, 1, 1, 0, 0, 0, 0], [1, 1, 1, 1, 1, 1, 1, 1, 1, 1, 1, 1, 1, 1, 1, 1, 1, 1, 1, 1, 1, 1, 1, 1]]
2.3 模型构建
代码位置:TMFCode\04-bert\src\bert_classifer_model.py
import torch
import torch.nn as nn
from transformers import BertModel
from config import Config
from utils import build_dataloader

conf = Config()
class BertClassifier(nn.Module):
    """
    BERT + 全连接层的分类模型。
    """
    def __init__(self):
        """
        初始化模型,包括BERT和全连接层。
        """
        super(BertClassifier, self).__init__()
        self.bert = BertModel.from_pretrained(conf.bert_path)
        self.fc = nn.Linear(conf.hidden_size, conf.num_classes)

    def forward(self, input_ids, attention_mask):
        _, pooled = self.bert(input_ids=input_ids, attention_mask=attention_mask, return_dict=False)
        out = self.fc(pooled)
        return out
2.4 模型训练及验证
代码位置:
导包以及相关配置:
import torch
import torch.nn as nn
import torch.optim as optim
from torch.optim import AdamW
from sklearn.metrics import classification_report, f1_score, accuracy_score, precision_score
from tqdm import tqdm
import os
from config import Config
from utils import build_dataloader, get_time_diff
from bert_classifer_model import BertClassifier
import time
# 加载配置对象,包含模型参数、路径等
conf = Config()
# 忽略的警告信息
import warnings
warnings.filterwarnings("ignore")
(1) 训练函数实现
def model2train():
    """
    训练 BERT 分类模型并在验证集上评估,保存最佳模型。

    参数:
        无显式参数,所有配置通过全局 conf 对象获取。

    返回:
        无返回值,训练过程中保存最佳模型到指定路径。
    """
    # 1. 加载训练、测试和验证数据集的 DataLoader
    train_loader, test_loader, dev_loader = build_dataloader()

    # 2. 定义训练参数,从配置对象中获取
    device = conf.device  # 设备("cuda" 或 "cpu")
    num_epochs = conf.num_epochs  # 训练轮数

    # 3. 初始化 BERT 分类模型
    model = BertClassifier().to(device)

    # 4. 定义优化器(AdamW,适合 Transformer 模型)和损失函数(交叉熵)
    optimizer = AdamW(model.parameters(), lr=conf.learning_rate)
    criterion = nn.CrossEntropyLoss()

    # 5. 初始化最佳验证 F1 分数,用于保存性能最好的模型
    best_dev_f1 = 0.0

    # 6. 遍历每个训练轮次(epoch)
    for epoch in range(num_epochs):
        # 设置模型为训练模式(启用 dropout 和 batch norm)
        model.train()
        total_loss = 0  # 累计训练损失
        train_preds, train_labels = [], []  # 存储训练集预测和真实标签

        # 7. 遍历训练 DataLoader 进行模型训练
        for batch in tqdm(train_loader, desc=f"Bert Classifier Training Epoch {epoch + 1}/{num_epochs}...."):
            # 7.0 提取批次数据并移动到设备
            input_ids, attention_mask, labels = batch
            input_ids, attention_mask, labels = input_ids.to(device), attention_mask.to(device), labels.to(device)

            # 7.1 前向传播:模型预测
            logits = model(input_ids, attention_mask)
            # 7.2 损失计算
            loss = criterion(logits, labels)
            # 7.3 梯度归零
            optimizer.zero_grad()
            # 7.4 反向传播
            loss.backward()
            # 7.5 参数更新
            optimizer.step()

            # 7.6 累计损失
            total_loss += loss.item()
            # 7.7 获取预测结果(最大 logits 对应的类别)
            preds = torch.argmax(logits, dim=1)
            # 7.8 存储预测和真实标签,用于计算训练集指标
            train_preds.extend(preds.tolist())
            train_labels.extend(labels.tolist())

            # 7.9 打印训练信息并评估验证集
            print(f"Epoch {epoch + 1}/{num_epochs}")
            print(f"Train Loss: {total_loss / len(train_loader):.4f}")
            # 在验证集上评估模型
            report, f1score, accuracy, precision = model2dev(model, dev_loader, device)
            print(f"Dev F1: {f1score:.4f}")
            print(f"Dev Accuracy: {accuracy:.4f}")

            # 7.10 如果验证 F1 分数优于历史最佳,保存模型
            if f1score > best_dev_f1:
                best_dev_f1 = f1score
                torch.save(model.state_dict(), conf.model_save_path)
                print("模型保存!!")

        # 7.11 计算并打印训练集的分类报告
        train_report = classification_report(train_labels, train_preds,
                                             target_names=conf.class_list, output_dict=True)
        print(train_report)
(2) 验证函数实现
def model2dev(model, data_loader, device):
    """
    在验证或测试集上评估 BERT 分类模型的性能。

    参数:
        model (nn.Module): BERT 分类模型。
        data_loader (DataLoader): 数据加载器(验证或测试集)。
        device (str): 设备("cuda" 或 "cpu")。

    返回:
        tuple: (分类报告, F1 分数, 准确度, 精确度)
            - report: 分类报告(包含每个类别的精确度、召回率、F1 分数等)。
            - f1score: 微平均 F1 分数。
            - accuracy: 准确度。
            - precision: 微平均精确度。
    """
    # 1. 设置模型为评估模式(禁用 dropout 和 batch norm)
    model.eval()

    # 2. 初始化列表,存储预测结果和真实标签
    preds, true_labels = [], []

    # 3. 禁用梯度计算以提高效率并减少内存占用
    with torch.no_grad():
        # 4. 遍历数据加载器,逐批次进行预测
        for batch in tqdm(data_loader, desc="Bert Classifier Evaluating ......"):
            # 4.1 提取批次数据并移动到设备
            input_ids, attention_mask, labels = batch
            input_ids, attention_mask, labels = input_ids.to(device), attention_mask.to(device), labels.to(device)

            # 4.2 前向传播:模型预测
            logits = model(input_ids, attention_mask)

            # 4.3 获取预测结果(最大 logits 对应的类别)
            batch_preds = torch.argmax(logits, dim=1)

            # 4.4 存储预测和真实标签
            preds.extend(batch_preds.cpu().numpy())
            true_labels.extend(labels.cpu().numpy())

    # 5. 计算分类报告、F1 分数、准确度和精确度
    report = classification_report(true_labels, preds)
    f1score = f1_score(true_labels, preds, average='micro')  # 使用微平均计算 F1 分数
    accuracy = accuracy_score(true_labels, preds)  # 计算准确度
    precision = precision_score(true_labels, preds, average='micro')  # 使用微平均计算精确度

    # 6. 返回评估结果
    return report, f1score, accuracy, precision
(3) 日志效果
if __name__ == '__main__':
    # 主程序入口
    model2train()

    # 1. 加载测试集数据
    train_dataloader, test_dataloader, dev_dataloader = build_dataloader()
    # 2. 初始化 BERT 分类模型
    model = BertClassifier()
    # 3. 加载预训练模型权重
    model.load_state_dict(torch.load("../save_models/bert20250521_.pt"))
    # 4. 将模型移动到指定设备
    model.to(conf.device)
    # 5. 在测试集上评估模型
    test_report, f1score, accuracy, precision = model2dev(model, test_dataloader, conf.device)
    # 6. 打印测试集评估结果
    print("Test Set Evaluation:")
    print(f"Test F1: {f1score:.4f}")
    print("Test Classification Report:")
    print(test_report)
输出日志:
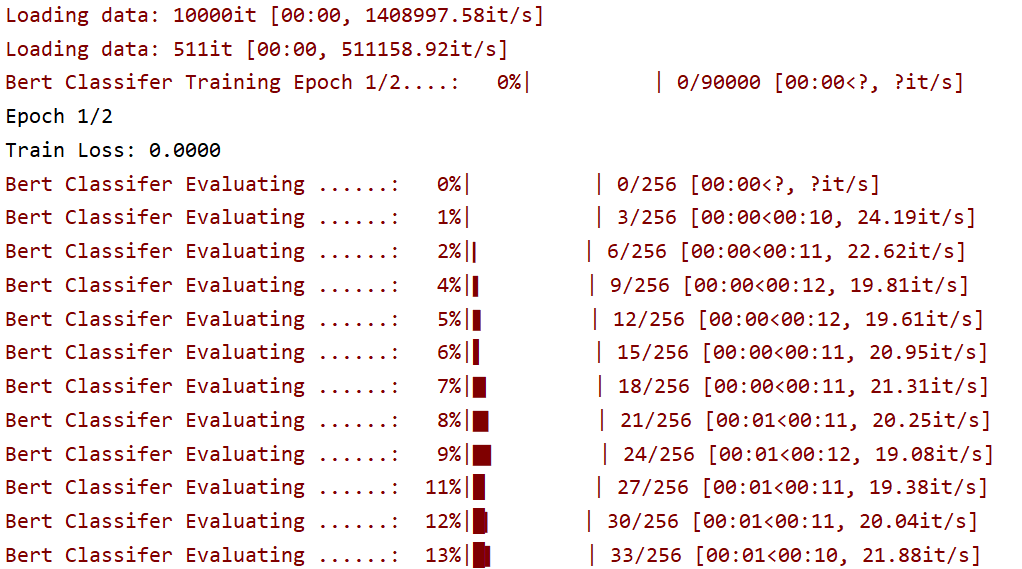
Bert Classifier Evaluating ......:   0%|          | 0/2 [00:00<?, ?it/s]Epoch 2/2
Train Loss: 0.0107

Bert Classifier Evaluating ......:  50%|█████     | 1/2 [00:00<00:00,  9.22it/s]
Bert Classifier Evaluating ......: 100%|██████████| 2/2 [00:00<00:00,  9.09it/s]
Bert Classifier Training Epoch 2/2....:   5%|▌         | 38/704 [00:18<05:32,  2.01it/s]Dev F1: 0.9276
Dev Accuracy: 0.9276

..........
Epoch 2/2
Train Loss: 0.0042

Bert Classifier Evaluating ......:   0%|          | 0/2 [00:00<?, ?it/s]
Bert Classifier Evaluating ......:  50%|█████     | 1/2 [00:00<00:00,  9.75it/s]
Bert Classifier Evaluating ......: 100%|██████████| 2/2 [00:00<00:00,  9.62it/s]
Bert Classifier Training Epoch 2/2....:   100%|██████████| 704/704
Dev F1: 0.9364
Dev Accuracy: 0.9364
结论: 采用BERT预训练模型的验证集测试 F1和Acc能达到93.17%,效果显著。
2.5 预测脚本
代码位置:
导入工具及相关配置、加载模型:
import torch
from transformers import BertTokenizer
from bert_classifer_model import BertClassifier
from config import Config
# 初始化配置
conf = Config()

device = conf.device
tokenizer = conf.tokenizer
model = BertClassifier().to(device)
model.load_state_dict(torch.load("../save_models/bert20250521_.pt"))
model.eval()
以下为预测函数:
#预测函数
def predict(data):
    # 1.获取数据 data['text']
    text = data['text']

    # 2.预处理数据----text===> input_ids,attention_mask <=== tokenizer.encode_plus
    tokenize = tokenizer.encode_plus(text, return_tensors='pt')
    input_ids = tokenize['input_ids'].to(device)
    attention_mask = tokenize['attention_mask'].to(device)

    # 3.模型预测
    ## 3.1 关闭梯度计算
    with torch.no_grad():
        ## 3.2 前向推理 model()
        pred_logits = model(input_ids, attention_mask)
        ## 3.3 获取预测结果---softmax  argmax(最大概率值所对应的索引)  class_name
        pred_prob = torch.softmax(pred_logits, dim=1)
        pred_ids = torch.argmax(pred_prob, dim=1)
        pred_class = conf.class_list[pred_ids]

    return {"text": text, "pred_class": pred_class}
输入日志:
2.6 模型部署
(1) 服务端
# 模型部署
import fasttext
import jieba
from predict_fun import predict
from flask import Flask, request,jsonify

app = Flask(__name__)

@app.route('/predict', methods=['POST'])
def predict_api():
    # 获取请求数据
    data = request.get_json()
    #预测
    print("-------------预测结果------------")
    result=predict(data)
    print(result)
    return jsonify(result)

if __name__ == '__main__':
    app.run(host='0.0.0.0',port=8003)
启动日志:
C:\python.exe C:\TMFCode\04-bert\src\api.py
 * Serving Flask app 'api'
 * Debug mode: off
WARNING: This is a development server. Do not use it in a production deployment. Use a production WSGI server instead.
 * Running on all addresses (0.0.0.0)
 * Running on http://127.0.0.1:8003
 * Running on http://26.26.26.1:8003
(2) 客户端
import requests
import time
# 定义预测接口地址
url = 'http://127.0.0.1:8003/predict'
# 构造请求数据
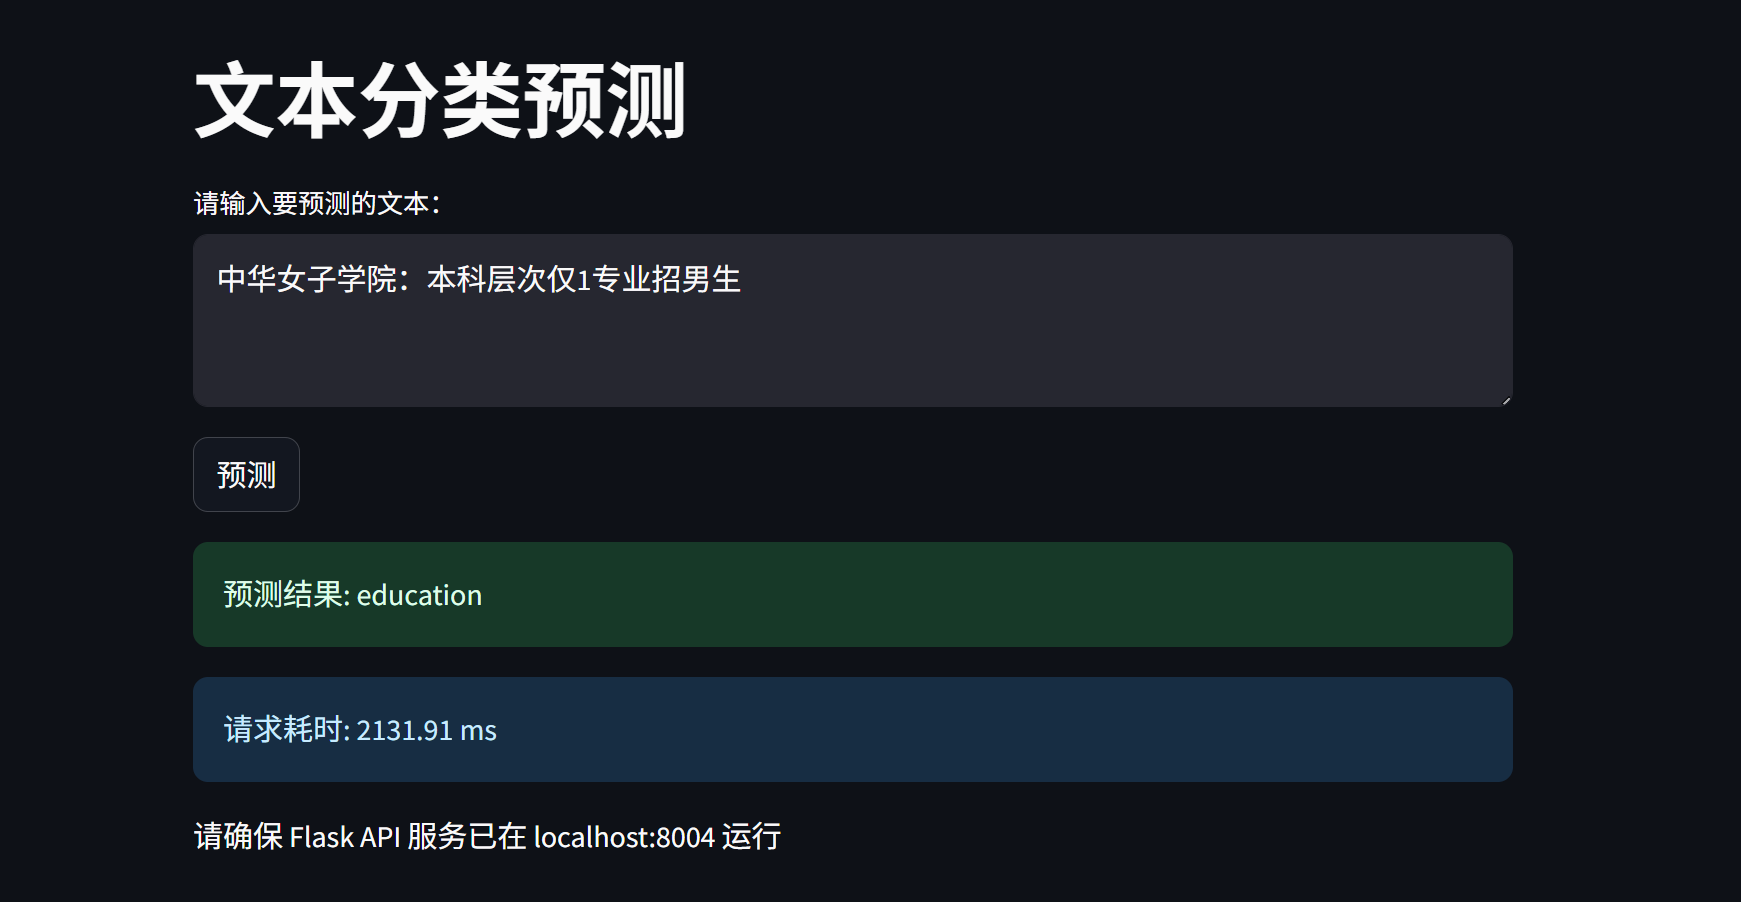
data = {'text': "中华女子学院:本科层次仅1专业招男生"}
# 记录开始时间
start_time = time.time()
# 发送 POST 请求
try:
response = requests.post(url, json=data)
# 计算耗时(毫秒)
elapsed_time = (time.time() - start_time) * 1000
print(f"请求耗时: {elapsed_time:.2f} ms")
# 检查响应状态
if response.status_code == 200:
result = response.json()
print(f"预测结果: {result['pred_class']}")
else:
print(f"请求失败: {response.status_code}, {response.json()['error']}")
except Exception as e:
print(f"请求出错: {str(e)}")
输出日志:
2.7 前端预测
代码位置:TMFCode\04-bert\src\app.py
启动命令: